Beaded Necklace Instructions: Knotted Pearl Design
Make a beautiful beaded necklace with my easy beaded necklace instructions below. When I was travelling in Vietnam, I came across an elegant beaded necklace similar to this at a small market stall in Hoi An. I love the design - it is funky yet stylish, and even better...based on a very simple pattern! I've posted up these simple beaded necklace instructions so that you too can make this lovely necklace (below).
To match, you can also make a lovely set of drop pearl earrings .
So, all you need to do is decide which beads to make your necklace with, and follow the simple beaded necklace instructions below...
Why not make a pearl necklace for your Mom? A perfect birthday, Christmas, or Mother's day gift!
Use funky, colourful beads to make a gift for your teenage daughter?
Wooden beads can also be used to make a necklace with a down-to-earth feel - perfect for intrepid friends!
You can follow the beaded necklace instructions below with any bead types to create the look and feel that you want. This design works best when you choose 2 slightly different sizes of beads.
"Thank you so much for these brilliant instructions. I made the lovely knotted necklace and earring set - so simple and yet it looks beautiful on. I have had loads of complements and when I told people I made it they all wanted me to make one for them!!!!" ~Janine
Beaded necklace instructions
I use silk thread as it is traditionally used for stringing pearls, but you can also use a nylon beading cord for other bead types.
Equipment
- 150cm silk thread (choose a colour to match your beads)
- 30 beads, 9-10mm diameter (cream pearls in this case)
- 30 beads, 6-7mm diameter (red pearls in this case)
- 1 2-hole clasp (I have used a 2-hole clasp, but you would be able to use a 1-hole clasp as well).
- 2 beading needles (to fit your bead holes)
- thin pointy object (knitting needle, inside of a ball-point pen...)
- superglue
Estimated time to make : 2 hours (you can watch a movie while you make it)
 Step 1
: Thread one needle onto each end of your piece of bead thread.
Step 1
: Thread one needle onto each end of your piece of bead thread.
 Step 2
: Thread a needle through each hole of the clasp. Pull the thread so that you have an equal amount of thread on either side of the clasp.
Step 2
: Thread a needle through each hole of the clasp. Pull the thread so that you have an equal amount of thread on either side of the clasp.
 Step 3
: Secure the clasp in place by tying off with a simple overhand knot. Treat the two separate threads as one piece of thread for tying off this knot.
Step 3
: Secure the clasp in place by tying off with a simple overhand knot. Treat the two separate threads as one piece of thread for tying off this knot.
 Make sure your knot is nice and close to the clasp.
 Step 4
: Thread one bead onto each strand.
Step 4
: Thread one bead onto each strand.
Note : As you are dealing with a long length of thread, remember to be patient and pull the strands slowly , otherwise they will tangle together and knot up!
 Step 5
: Use an overhand knot to secure the two beads in place. Again, consider the two strands as one piece of thread for tying off this knot. Pull strands
slowly
through the knot to prevent any tangles.
Step 5
: Use an overhand knot to secure the two beads in place. Again, consider the two strands as one piece of thread for tying off this knot. Pull strands
slowly
through the knot to prevent any tangles.
 Handy hint
: To tie the knot in place, put a thin pointy object through the loop of the knot as you are tying it. Pull the knot to the right location along the thread using this object (a thin knitting needle or the centre of a pen can be handy tools).
Handy hint
: To tie the knot in place, put a thin pointy object through the loop of the knot as you are tying it. Pull the knot to the right location along the thread using this object (a thin knitting needle or the centre of a pen can be handy tools).
 Slide the object out of the loop once the knot is in place, and push in the direction of the knot with your thumb and forefinger to close off the loop of thread and make the knot tight and secure.
 It should now look something like this.
 Step 6
: Repeat step 3 and 4 until you have used up all your beads.
Step 6
: Repeat step 3 and 4 until you have used up all your beads.
 Step 7
: Secure the string of beads to the other side of the clasp. Thread each needle through the clasp, and tie the two strands together securely. Tie a second knot over the first knot. Use a drop of super glue on the knot to prevent it from coming undone.
Step 7
: Secure the string of beads to the other side of the clasp. Thread each needle through the clasp, and tie the two strands together securely. Tie a second knot over the first knot. Use a drop of super glue on the knot to prevent it from coming undone.
 Once the glue has dried, carefully cut off the extra thread.
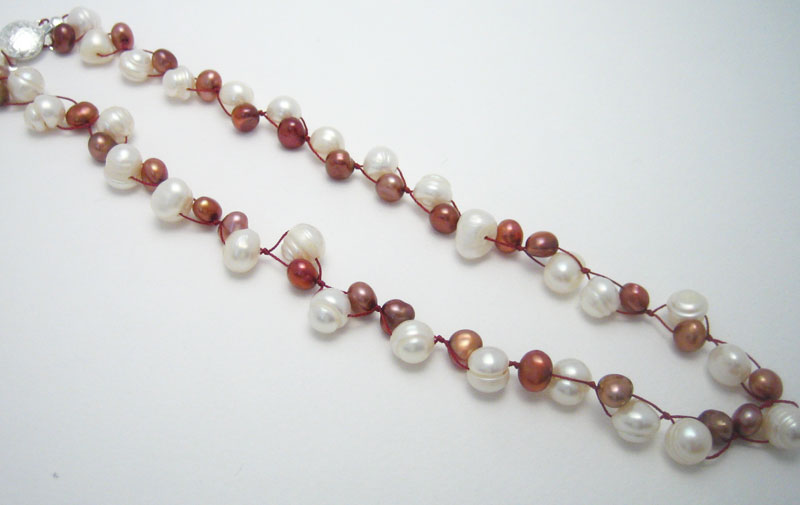
And here is the finished beaded necklace - I hope you enjoyed making it!
What Next?
Now that you have learnt the technique, follow these same beaded necklace instructions with another type of bead and make another wonderful gift!
Want more free jewellery making instructions? Have a go at making a pair of matching earrings .