These easy to make Christmas decorations are perfect for brightening up your living room or Christmas tree. One of the things I enjoy most about Christmas is that you get to make your own Christmas decorations. Store-bought decorations are okay, but homemade Christmas tree decorations add a warm, homely touch that simply can't be purchased in a store. My aim with this page is to provide you with clear instructions for making Christmas decorations, so that you can share in the fun :-) Like I said on my home-page, I sometimes run short of patience for projects that are too fiddly, so I'm going to focus on fairly simple homemade Christmas ornaments. Simple, but beautiful! Just click on any of the thumbnail pictures below for instructions on easy Xmas decorations to make.
Gallery of Easy to Make Christmas Decorations
Easy to Make Christmas Decorations: Window Star
Some of my favourite easy to make Christmas ornaments are these gorgeous tissue-paper window stars. When the sun shines through them, they look absolutely stunning, and really brighten up a room :-) Here are some that I put up in our living room: To make your own window stars, you'll need: - Coloured tissue paper or kite paper (available from craft stores)
- A pencil
- A ruler
- Scissors
- Double sided tape
Step 1 Using your pencil and ruler, draw 8 rectangles on the tissue paper and cut them out. Make each rectangle twice as long as it is wide. Your final star will be twice the height of a rectangle.
You can use as many or few colours as you like. I'll demonstrate with a rainbow coloured star.
Step 2 Pick one of the rectangles. Fold it in half lengthwise, and then unfold again, to leave a crease down the center.
Step 3 Fold each of the corners to meet the center line.
Step 4 (Different paper, just to show the folds more clearly)
On the right, fold the two edges in to meet the center line again, like you were making a paper plane. On the left, fold the corners so they look like this. These little folds will make a pretty "star within a star" effect later on.
Step 6 Fold all the other pieces the same way.
Step 6 Turn one of the pieces over, and put a strip of double-sided tape on it like this. I've left the backing on my tape so that you can see it clearly, but obviously you should peel the backing off yours.
Step 7 Place the piece on top of another piece, like this. Notice that the taped edge on the pink piece lines up with the center-line on the blue piece.
Step 8 Add the rest of pieces in the same way. Finally, you'll need to complete the star by taping the first and last pieces together. The easiest way is to fold back the star like this, put some tape on, then fold it back down.
Step 9 The finished star! You can flatten it in a book for a few hours to set the creases. Because these pack flat, they're great for sending as gifts inside Christmas cards.
To attach your star to a window, use a tiny dab of glue-stick. If you use too much, it will be impossible to remove the star without tearing it. Instead of using glue, you can also attach a hanging thread to one point of the star.
On to the next easy to make Christmas decoration...
Easy to Make Christmas Decorations: Colourful Paper Baubles
Of all the homemade decorations, Christmas baubles are one of the most traditional. When I was a kid, my parents had some store-bought baubles like this in a plain red. Recently I discovered a tutorial, so now you and I can make them in all colours of the rainbow :-) I tweaked the method a little bit, to give fuller-looking baubles. The method is still pretty simple... as befitting a page on easy to make Christmas decorations. To make your own baubles, you'll need: - Colourful paper or card
- A pencil
- Something circular to trace around (e.g. a glass)
- Scissors
- Some "mini glue dots" or glue or double sided tape
- Craft wire (florist wire will do) or a stapler
Step 1 Use your glass and pencil to draw 12 circles onto your paper and cut them out. I'll use three different colours, but you can use as many or as few as you like.
Paper that has diferent colours on the back and front gives a nice effect, if you can find some.
Step 2 Fold all the circles in half and stack them on top of each other.
For the obsessive compulsive (like me!), here are some tips for getting a symmetric-looking colour distribution on the final bauble: If using 3 colours A B C, then stack them in the order ABBCCAABBCCA. If using 2 colours A B, then stack them in the order ABBAABBAABBA. If using a single type of card, but double sided, then alternate "heads up" and "tails up".
Step 3 Wrap a lenth of wire all the way around the stack, so that it runs along the fold. Twist the ends together to secure. You can just see the wire in this photo - it's the thin black line down the middle.
If you don't have wire, you can also just staple the stack together, once at the top and once at the bottom, so that the staple sits right on the fold.
Step 4 Stick a glue dot onto a circle, about 1/3 of the way from the bottom. The dot is hard to see, so I'm pointing to it with a pencil. Fold the facing flaps together and press to secure the bond.
If you don't have glue dots, you can use double sided tape or a bit of glue. I prefer not to use regular glue, because it can warp the paper.
Step 5 On the next circle along, stick a glue dot about 1/3 of the way from the top. Continue like this all the way around, alternating high and low glue dots.
Step 6 Once you've glued all the adjacent flaps together, this is what the finished bauble looks like from the top and from the side.
Now you can attach a ribbon and hang it your Christmas tree. Or give it as a gift for someone else to hang on their tree :-)
Instructions for another easy to make Christmas decoration follow below...
Easy to Make Christmas Decorations: Make Christmas Wreaths from Paper
Normally people make Christmas wreaths from evergreens, because plants that survive winter symbolise the strength of life. I'll show you a slightly unconventional (but still beautiful) way to make Christmas wreaths... from paper :-) I came across the method on this blog post, which incidentally has some really stunning photos. To make Christmas wreaths this way, you'll need: - Colourful paper or card
- A pencil
- A ruler
- Scissors
Step 1 Cut out 8 rectangles from coloured card or paper. Each rectangle should be twice as long as it is wide. If you're using paper, then you can start with squares instead, and fold them in half to make rectangles.
Step 2 Pick one of the rectangles, and fold it in half lengthwise, so that the fold is toward you and the cut edges are away from you.
Step 3 Fold the top corners down to meet the bottom edge.
Step 4 Fold in half like this.
Step 5 Fold all the other pieces the same way.
Step 6 Take a close look at one of the pieces. There are two "slots", where another piece can slide into it. I've widened them here to make them obvious.
Step 7 Fit two pieces together like this. The two prongs on the red piece fit into the two slots on the green piece.
Step 8 Continue slotting all the pieces together. Tadaa! You have a wreath! Add a ribbon and hang it on your tree :-)
Why not jazz it up with some glitter? Or try making it with different papers - you can make artistic ones using pages from old magazines. You could even make them from recycled Christmas cards!
Scroll down further for instructions on another easy to make Christmas decoration...
Easy to Make Christmas Decorations: Woven Paper Heart Baskets
Woven heart baskets are a Scandinavian tradition, and are perfect for filling with nuts or candies. These easy to make Christmas decorations are effectively little gift bags that you can hang on the Christmas tree :-) To weave your own heart baskets, you'll need: - Card, in two or more colours. I'll use white and red for this example.
- A pencil
- A ruler
- Scissors
- Some glue or double sided tape
Step 1 Cut two long rectangles of card from different colours. Each rectangle should be about three times as long as it is wide. 12 inches by 4 inches (30cm by 10 cm) is a good size.
Step 2 Pick one of the rectangle and fold it in half, with the cut ends facing away from you. Draw a square with a semi-circle on top. Then draw two vertical lines, evenly spaced, that divide the square into three strips. Important: Extend the vertical lines about 3/16 of an inch (0.5cm) beyond the top edge of the square Cut out along the semi-circle, and cut along the vertical lines. Repeat for the other piece of card.
Step 3 Weave the bottom strip of the red half into the white half. The red strip should alternate between going inside and outside the white strips.
Step 4 Continue with the remaining red strips. It's a bit fiddly the first time, but you'll get the hang of it. The second one you make will be much easier, I promise! You can attach a handle by gluing an extra strip of card onto the inside of the basket. Here's mine finished: Fill it with sweeties and give it as a Christmas gift! Once you've mastered the 3-strip basket, you can also try making baskets with more strips, wavy strips, diagonal strips, etc. Experiment and have fun with it! More easy to make Christmas decorations below...
Easy to Make Christmas Decorations: Woven Paper Balls
Slightly trickier than the previous easy to make Christmas decorations, but well worth it! I found a nice tutorial for the weaving method here, and modified it very slightly. I found it easier to join the strips with double-sided tape rather than interlocking slits. Also, for this tutorial I used all different coloured strips, so that it's easier to see the way that the strips overlap each other. (Trivia: woven balls like this are used in a Thai version of volley ball called Takro. Players hit the ball with their feet instead of their hands.) Before you start Gather your materials. You'll need:
- coloured card (between 1 and 6 colours)
- scissors
- a pencil
- a ruler
- double sided tape or some glue
Step 1 Cut 6 thin strips of card. Each strip should be about 3/8 inches (0.5cm) wide, and 12 inches (30cm) long. The exact dimensions don't matter too much, so long as all the strips are the same size.
Step 2 Take one of the strips and glue or tape its ends together to make a loop. Set aside.
Step 3 Arrange the other five strips into a pentagon. Each strip alternates over and under its neighbours.
It's easiest to focus on making the little pentagon at the center first, then rearrange things to get the overs-and-unders correct afterwards.
Step 4 Put the loop on top of the pentagon, and poke every second loose end through the loop. The ends to poke through are the ones that last went "under" at the outermost crossing.
You might find that the loop tries to spring away - the trick is to keep holding it down as you thread the loose ends through.
Step 5 Join the loose ends together, one by one, making sure that they alternate under and over other strips that cross their path.
It's a little tricky the first time you do it, but take your time, and just think under, over, under, over... and you'll get it right. When you finish, your ball should like this, made up of triangles and pentagons. Now add a ribbon and it's ready to brighten up a Christmas tree!
Scroll down to see instructions for more easy to make Christmas decorations...
Easy to Make Christmas Decorations: Clove Oranges
Of all the homemade christmas ornaments to make, I love making clove oranges the best. They are really quick and easy to make Christmas ornaments and they look so lovely hanging from a tree, or displayed in bowls around the house. They also smell so nice, and their spicy aroma really brings that Christmas feeling into the home! Before you start Gather your materials. You'll need:
- an orange
- thin ribbon (enough to wrap around your orange twice and a bit more)
- cloves

1. Wrap the ribbon around the orange, twisting at the base, to divide the orange into quarters.
2. Feed the ends under the piece of ribbon at the top of the orange.
3. Tie a simple overhand knot to secure the ribbon in place.
4, 5, 6. Now start pressing cloves into your orange. I like to outline the ribbon with cloves first, and then fill in the gaps.
You can also make pretty patterns on your orange with cloves. Try making stars, hearts and more!
Once you are finished, hang your clove orange on your tree and enjoy the spicy, Christmas aroma! Try decorating several oranges or clementines with cloves and display them in pretty bowls around the house. This will add a beautiful aroma to your rooms at Christmas time, and looks great too!
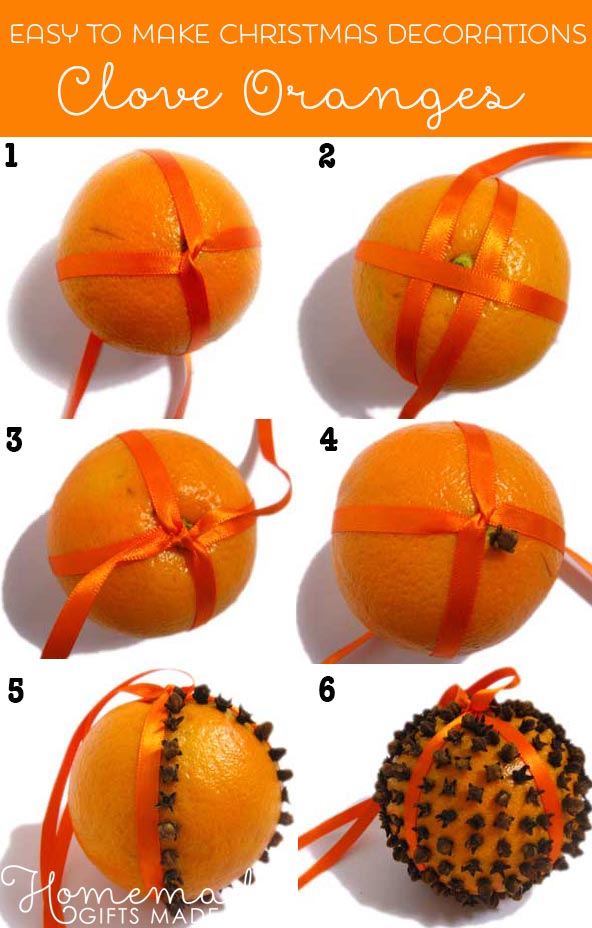
What next?I hope you enjoyed my instructions for easy to make Christmas decorations! If you have any comments or questions, or you'd like to contribute your own ideas for easy to make Christmas decorations, get in touch using this handy form. Also, make sure you sign up to my free newsletter and I'll keep you posted on more easy craft ideas. Learn more... Here are some other pages on my site you might enjoy: Homemade Christmas Gift Ideas Gift Wrapping Techniques
Happy Gifting!
Back to Homemade Christmas Gift Ideas Return from Easy to Make Christmas Decorations to Home Page

|