Paracord Lanyard Instructions
For Complete Beginners

An intricately woven paracord lanyard to hold your keys or pocketknife. The "king cobra" design looks cool, and you'll always have 12 feet of super-strong paracord handy.
There are loads of ways of braiding lanyards, depending on how much cord you'd like to carry, how many colors you want to use, and what kind of attachments you want at each end. I'll show you one main way and then pictures of a few variations you can try.
Paracord Lanyard Materials
You will need:
- 13 feet (approx 4m) of 550 paracord *
- Metal clip - from key-cutter shop
- Ruler or tape-measure
- Rubber band
- Scissors
- Lighter
550 paracord is about 4mm (somewhere between 1/8" and 1/4") in diameter. It feels a bit like a nylon shoelace. You can buy it at army surplus stores, camping and outdoor stores, or ebay.
I've tried using other, slightly thicker cords, but they produced rather chunky lanyards. I'd stick with the 550 paracord if you can find it.
Got your materials? Great! Time to learn how to make a paracord lanyard with them...
Paracord Lanyard Instructions
Step 1 - Mark the Center of the Paracord
Fold the paracord in half. Mark the center by tying the rubber band around it like this:

Of course, you could just as well use a piece of string/wire/chewing gum/whatever you like to mark the center instead. But I happened to have a rubber band nearby so that's what I used.
Step 2 - Tie a Lanyard Knot
What's a lanyard knot? It's this decorative, round-ish knot:

How do you tie it? Just follow my easy step-by-step lanyard knot video . I promise it's not that hard. But if the lanyard knot looks too intimidating, you can always just do a simple overhand knot instead like this:

Whichever knot you choose, you'll probably need to adjust its position a bit once you've tied it. Make it so that the loop on the end is about 2" (5cm) long. Also, you want the center of the paracord (marked by the rubber band) to be right on the end of the loop.
Once you've got the loop sized & positioned correctly, you can get rid of the rubber band.
Step 3 - Measure Lanyard Length
Poke the two loose ends of paracord through the loop on the metal clip. Pull them through until the distance between the lanyard knot and the metal clip is 5" (about 12.5cm).

Optional: If the metal loop is quite wide, you can poke the loose ends through the metal loop a second time, like this:

Step 3 - Cobra Stitch
What's a cobra stitch and how do you tie one? It's sort of like a "granny knot". You can learn how to tie it on my cobra stitch page . Don't worry, it's easy!
Use the two loose ends to tie 11 cobra stitches down toward the lanyard knot. You will end up with 11 little "bumps" on each side, like this:

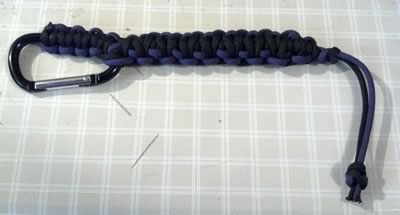
Step 4 - King Cobra Stitch
Double back and do another set of cobra stitches on top of the set you just made. This is called the "king cobra stitch". You can watch my king cobra video instructions for more detail. This is what the king cobra stitch looks like:

Continue all the way back up to the metal clip. (In this pic I'm using a mini carabiner as a clip.)
Step 5 - Tidy Up Loose Ends
It's time to snip off the loose ends from the king cobra stitch. Pick one loose end to start with. Cut it short, to leave about 1/4" (5 mm) poking out of the bracelet.
Melt this end with a lighter, and press on the molten end with a wet finger (or the flat edge of a knife). This stops it fraying. Also, by pressing on the end, you squash it into a sort of mushroom shape (like the head of a nail), which stops it working loose. Just be careful not to burn your fingers!
Repeat for the other loose end.
Here's a picture of one of the molten ends to show you what I mean:

Well done! Your paracord lanyard is finished.
Buy one instead?
Sometimes people ask if they can buy a paracord lanyard from me. Unfortunately I don't make them to sell (not enough hours in the day!), but plenty of other people sell them on Amazon. If you'd like to, you can click here to browse paracord lanyards on Amazon.com .
Using the Paracord Lanyard
Option 1 (left): Metal clip onto a belt loop, and other end holds keys.
Option 2 (right): Belt goes through loop, metal clip holds keys.

Maybe this is kind of obvious, but just for completeness, here is how you get your keyring onto the loop end of the lanyard: Slide keyring onto loop at end of lanyard. Poke other end of lanyard through loop. Easy!

Variation: Two-Color Paracord Lanyard
You can do the king cobra stitch in a different color to the underlying cobra stitch. Here's a close-up of one I wove in green and black:

And here's a very nice one made by Andreas Odegard:

To make a two-color lanyard, start off with 7 feet of green paracord and 7 feet of black (or choose your own colors). Using the black paracord, follow the instructions up the end of step 3, and cut and melt the loose ends as in step 5. Then, using the green paracord, do a layer of king-cobra stitches on top, as in step 4, then cut and melt the ends of the green paracord.
Not sure how to start off the king-cobra stitches with the green cord? It's just the same as how you start the cobra-stitch in step 3 of the paracord bracelet project .
As another variation on the 2-color lanyard, one of our visitors Robert made this neat mini two-color lanyard using a single layer of cobra stitches, similar to the paracord bracelet project. Thanks for sending in the pictures Robert!

Variation: Extra-long Paracord Lanyard
Here's a neat idea sent in by visitor Logan:
"I made the same lanyard type but about 1.5 feet long. I attached a multi-tool on the end of it and put a clip on the other end. That way I can attach it to my tactical vest while out in the field, and the lanyard is long enough to use the tool so there's no risk of losing it." ~ Logan


Thanks for sending in your photos Logan!
Variation: Chunky Carabiner Paracord Lanyard
A neat variation on the lanyard using a full-size carabiner, made by visitor Dakota:
"At the base I lanyard-knotted two different colors together for the center of the cord, continued as normal, and used a full size carabiner with the king cobra but I continued up the side and wound up with this. Also I used 14 feet of cord instead of 13." ~Dakota
Thanks for sending in your photo Dakota!
What Next?
How did you go making your paracord lanyard? You might also like to have a go at making a paracord bracelet .
If you're making a paracord gift for your Dad for father's day, check out our father's day quotes, messages, and poems to help you write a great card to your Dad too.
If you have any comments or suggestions on my instructions, or just want to say hi, then please contact me with this handy form .