Make a Bead Bracelet with Memory Wire

Make a bead bracelet using memory wire next time you need a quick girly gift idea! I picked up some memory wire quite inexpensively from a craft store, and it just became one of those things I had in my craft drawer but had never used...
Then one day I just realized how easy it would be to use up some spare beads and make something funky to match an outfit I had. It was, and I made my first memory wire bracelet in 30 minutes! After that, I made one for my friend's birthday when I realised it was the following day and I didn't have time to make anything else.
So have a look at your spare beads and see what you can make! Or pick up some with a specific project in mind. My aunty has a lovely memory wire bead bracelet made with pearls and crystal rondells - it looks so nice! I think I might have to order some more beads on ebay...
How to Make a Bead Bracelet: Equipment
- A few loops of memory wire (I used 3 loops worth, but it is totally up to you how big you make your bracelet!).
- A selection of beads. I have chosen to use red beads of all shapes/styles and a few clear crystals as well.
- You will also need some memory wire cutters, round-nose pliers and chain-nose pliers.
Memory wire is super strong so it is difficult to cut with normal pliers. That's why I recommend using memory wire cutters. If you're strong and persistent, you can cut it with normal pliers, but you might blunt them a little bit.
(If you don't own any tools but would like to make a beaded gift, do check out my other jewelry making projects listed at the bottom of this page - no tools required!).
How to Make a Bead Bracelet: Step by Step
Estimated time to make: 30 - 60 min

Step 1: First gather together a collection of beads to make your bracelet with and have a think about the pattern you want.
Choose a range of shapes, textures and sizes.
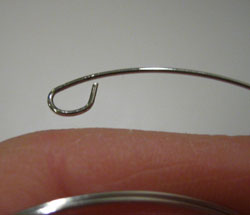
Step 2: Bend one end of the memory wire back on itself to make a small loop. This stops the beads from falling off the end. To make the loop, clamp near the end with your needle-nosed pliers. Use your chain-nosed pliers to clasp the very end of the wire. Bend the end of the wire back on itself, using the round-nosed pliers as a guide to give your loop a nice smooth shape.

Step 3: Feed your beads onto the other end of the memory wire. I used a random pattern for the red beads, and spaced the crystal beads at even intervals around the bracelet. Do whatever looks good with the beads you have :-)
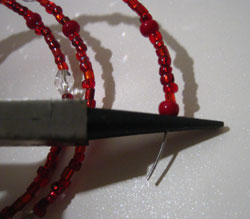
Step 4: Once you are almost at the end it is time to stop adding beads.
Clamp down your round-nosed pliers next to the final bead (make sure you push firmly against the beads and make sure they are tightly packed).

Step 5: Use your chain-nosed pliers to wrap the end of the memory wire around the round-nosed pliers (to make another loop). Don't worry if you have a bit too much wire, you can always trim it using your cutters.
I like to make sure the loop is as firmly shut as I can get it, so it won't catch on clothing or scratch.
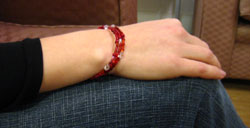
... and voila !
A funky, easy to make bracelet that is such a versatile design.
Have fun with it :-)
What Next?
Did you like my instructions on how to make a bead bracelet? Here are some other projects I think you might like: